When it comes to fishing, protecting your gear from water damage is a must. Waterproof storage not only shields your equipment from rust, mold, and corrosion but also keeps your essentials organized for efficient trips. This guide breaks down everything you need to know about creating your own waterproof storage system, tailored to your specific fishing needs.
Key Takeaways:
- Why Waterproof Storage Matters: Protects high-end reels, electronics, and lures from moisture-related damage, saving you money in the long run.
- Materials You’ll Need: Start with a water-resistant container, marine-grade sealants, and rubber gaskets for proper waterproofing.
- Choosing the Right Container: Look for options with high IP ratings (e.g., IPx7 or IPx8) and materials like polycarbonate or stainless steel for durability.
- DIY Steps: Clean the container, install seals and gaskets, and test for leaks using water immersion and spray tests.
- Organizing Gear: Use dividers and foam inserts to keep lures, hooks, and soft plastics secure and tangle-free.
- Maintenance Tips: Store dry gear, add silica gel packets, and inspect seals regularly to ensure long-term protection.
Quick Tip:
Pair your waterproof storage with tools like bungee cords for securing it on boats, and consider moisture-resistant clothing like Fishing Shorts for added convenience during trips.
This guide walks you through every step - from choosing the right container to organizing and maintaining your setup - for a hassle-free fishing experience.
Materials and Tools for DIY Waterproof Fishing Storage
Creating your own waterproof fishing storage requires the right materials and tools to ensure durability and protection against water and weather. By choosing components designed for marine use, you can build a storage solution that works seamlessly with your fishing gear.
Key Materials to Gather
Start with a sturdy container that is rated for water resistance - this will serve as the foundation of your project. To enhance its waterproofing, use marine-grade waterproof sealants, adhesives, and rubber seals. Products specifically tested for marine environments are ideal, as they offer reliable protection against moisture and harsh weather conditions.
Tools You'll Need
Once you've gathered your materials, it's time to assemble a toolkit. You’ll need basic tools like a cutting tool, measuring tape, and fasteners to assist with assembly or adjustments. Opt for tools and components that are built to withstand outdoor conditions to ensure your waterproof storage holds up over time.
For added convenience during your fishing trips, consider pairing your setup with quick-dry, water-resistant gear like Fishing Shorts and Mens Fishing Shorts from Reel Comfort.
Combining marine-grade materials with a few essential tools will help you create a durable and effective waterproof storage solution, perfectly suited for your fishing adventures.
How to Choose the Right Storage Container for Waterproofing
Picking the right container is key to keeping your fishing gear dry and your storage solution durable. The main thing to understand is the difference between water-resistant and waterproof. Water-resistant containers fend off light moisture, but waterproof ones completely block water.
Look for IP ratings to determine how much water protection a container offers. For example, IPx7 and IPx8 are suitable for temporary or continuous water immersion, while IPx4 and IPx6 only offer splash protection. If you need corrosion resistance - common in saltwater fishing - check for NEMA ratings like NEMA 4 or 4X.
Pay attention to seals and gaskets on all openings to ensure a tight, water-blocking fit. Materials matter too: polycarbonate and ABS are lightweight yet durable, while aluminum and stainless steel provide extra strength, especially in harsh conditions. If you’re fishing in saltwater, corrosion-resistant materials are non-negotiable.
Comparing Different Container Types
Each container type has its strengths and weaknesses. Here’s a quick breakdown to help you decide which option fits your fishing needs best.
| Container Type | Pros | Cons | Typical IP Rating | Price Range |
|---|---|---|---|---|
| Plastic Utility Boxes | Lightweight, affordable, easy to customize | Limited durability, basic sealing | IPx4 to IPx6 | $15 - $75 |
| Military Ammo Cans | Excellent sealing, durable, metal construction | Heavy, limited sizes, may rust | IPx7 to IPx8 | $25 - $150 |
| Pelican-Style Cases | Superior protection, customizable foam inserts, pressure relief valves | Expensive, bulky, might be overkill for basic needs | IPx7 to IPx8 | $100 - $500+ |
| Wooden Containers | Customizable, visually appealing, good insulation | Requires waterproofing and high maintenance | None (mod needed) | $50 - $200+ |
Plastic utility boxes are ideal for lightweight, portable storage. They’re perfect for tackle and smaller gear, especially if you’re experimenting with storage setups. While they only offer splash protection, you can easily upgrade them with additional sealing.
Military ammo cans are a tough, reliable choice for waterproof storage. These steel containers come with rubber gaskets and locking mechanisms to keep your gear dry in rugged conditions. They’re durable and come in various sizes, but their weight might be a drawback if you need something portable.
Pelican-style cases are the gold standard for waterproof storage. Equipped with pressure valves and foam inserts, they’re perfect for organizing and protecting electronics or other sensitive items. While they’re pricey, their high IP ratings and durability make them worth considering for extreme conditions.
Wooden containers add a touch of style and can complement your boat’s look. However, they require significant waterproofing and maintenance, making them better suited for permanent setups where aesthetics matter as much as functionality.
When choosing a container, think about the type of fishing you do. Calm freshwater conditions might only require a lighter, water-resistant option. On the other hand, saltwater fishing or rough weather calls for containers with higher IP ratings and corrosion-resistant materials. Investing in the right container ensures your gear stays protected for years, especially when paired with other quality fishing equipment.
And don’t forget to prioritize comfort during your fishing trips. Check out Fishing shorts or Men’s Fishing Shorts from Reel Comfort to stay comfortable on the water all day long.
Step-by-Step Guide to Waterproofing Your Storage
Turning your chosen container into a waterproof storage unit requires careful preparation and precise application of sealing components. Start by giving your container a thorough cleaning. Use a degreasing soap to remove oils, dirt, or any residue left from manufacturing, as these can prevent seals from properly adhering.
For best results, work in temperatures between 65°F–75°F. Cooler weather can make rubber gaskets stiff and harder to install, while warmer conditions might cause sealants to cure too quickly, leaving little time for adjustments. Once your container is clean and ready, proceed with installing the seals and testing your setup.
Installing Seals and Gaskets
The effectiveness of a waterproof storage system begins with properly installed gaskets. Start by measuring the perimeter of your container's lid or door opening. Opt for marine-grade rubber gasket material, and ensure you leave a bit of extra overlap at the corners for a secure fit.
Clean the gasket channel using isopropyl alcohol, let it dry completely, and apply a thin bead of marine silicone. Press the gasket firmly into place, working your way around the perimeter. Avoid stretching or bunching the material to ensure an even application.
If your container lacks built-in gasket channels, you can use closed-cell foam weather stripping to create a seal. Apply a continuous strip of foam, overlapping the ends by about an inch. Pay extra attention to corners and joints by adding a small amount of marine sealant, smoothing it out with your finger to eliminate air pockets.
Latch and hinge areas often require additional waterproofing. Apply marine grease to moving parts to protect them, and if possible, install rubber boots or covers over exposed mechanisms. These areas are more prone to wear and tear, so taking extra precautions can help prevent leaks.
Allow the sealants to cure for at least 24 hours before testing your container's waterproofing.
Testing for Waterproof Integrity
Testing is essential to confirm that your container is fully waterproof. Place several sheets of white tissue paper inside the container, then seal it completely. Submerge the container in a bathtub or large bucket for 30 minutes and check the tissue for any signs of moisture.
Next, spray the sealed container from all angles using a hose nozzle set to high pressure. Pay close attention to seams, latches, and corners, as these are the most likely spots for leaks.
For a more thorough test, submerge the container for 2 hours, using a weight if necessary to keep it underwater. Look for air bubbles escaping from the container, as they may indicate potential leak points. If you find any leaks, mark those areas with a waterproof marker, dry the container thoroughly, and apply additional sealant. Always retest after making repairs to ensure the issue has been resolved.
Just like investing in quality Fishing shorts or Mens Fishing Shorts enhances your comfort during long fishing trips, proper testing ensures your gear stays dry when it matters most.
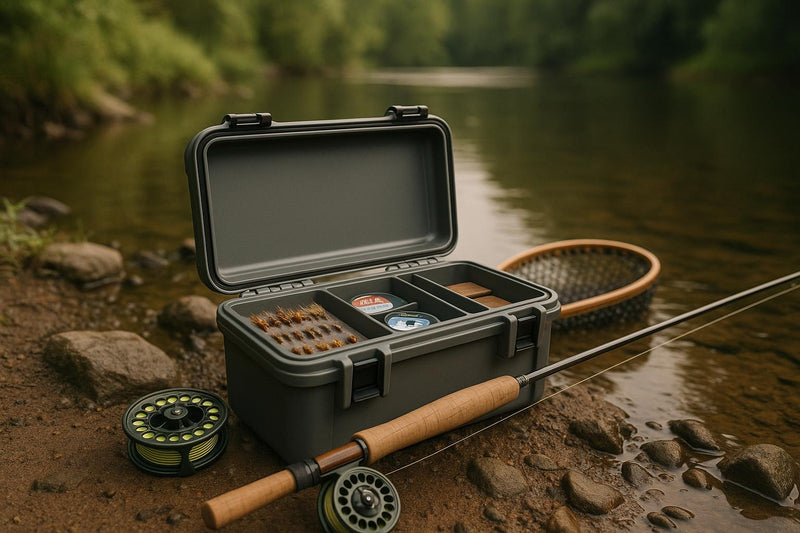
Organizing the Interior for Fishing Gear
Once you've tested your storage system, it's time to organize the interior to keep your fishing gear secure and in good condition. A well-organized setup not only complements waterproof protection but also prevents damage to your equipment during transport.
Creating Dividers and Compartments
Using plastic dividers is a practical way to create adjustable compartments. Materials like polycarbonate and acrylic are particularly useful since they’re durable and transparent, allowing you to see your gear at a glance. Many tackle storage systems come with adjustable dividers that snap securely into place, keeping everything from shifting while you're on the move.
For more delicate gear - like treble hooks, expensive lures, or fragile terminal tackle - foam inserts are a great option. Closed-cell foam is especially effective because it’s moisture-resistant and can be cut to create custom slots, ensuring your items stay secure and untangled.
A combination of plastic dividers and foam inserts works best. Use dividers to create larger sections for different types of gear, and then add foam inserts within those sections to protect delicate items. Once your compartments are set up, organize your gear by type to make it easier to grab what you need when fishing.
Organizing Fishing Gear
Hard baits and lures, like crankbaits, spinnerbaits, jigs, and topwater lures, benefit from individual compartments. This prevents hooks from tangling and protects the finishes from damage. For your most expensive or frequently used lures, foam inserts with custom-cut slots provide extra protection, while adjustable plastic compartments can handle the rest.
Soft plastic baits require extra care to avoid melting or discoloration. Whenever possible, keep them in their original packaging, as these are designed to prevent chemical reactions. If you’ve opened a package, transfer the baits to soft bait binders with clear plastic sleeves to keep different colors and styles separate. During hot summer trips, proper storage becomes even more important since heat can accelerate chemical reactions. Just like moisture-wicking fishing shorts help you stay cool and comfortable, careful storage of soft plastics protects your gear in high temperatures.
When it comes to small accessories, clear plastic compartment boxes with multiple sections are ideal. Group similar items together and label each section for quick access. Pre-rigged leaders and rigs are best stored in leader wallets or organizers with individual sleeves to prevent tangles. Coil leaders loosely to avoid memory kinks, and separate them by pound-test ratings to avoid confusion while fishing.
Think about your fishing style when organizing your gear. Keep the items you use most often easy to reach, while backup or specialty gear can be stored in less accessible spots. And for added comfort during long fishing trips, check out Reel Comfort's Men's Fishing Shorts, featuring padded protection and quick-dry fabric to keep you comfortable all day.
sbb-itb-cb0a783
Maintaining and Testing Your Waterproof Storage
Taking care of your waterproof storage is key to keeping your gear safe from moisture, rust, and other damage. A little routine maintenance can go a long way in preserving its effectiveness.
Ensuring Your Gear Is Dry Before Storing
Always double-check that your gear is completely dry before sealing it in a waterproof container. Even a small amount of trapped moisture can weaken the container's waterproofing and lead to rust over time.
Seasonal Maintenance Tips
As the seasons change, it’s a good idea to give your storage a quick check-up. Here are a couple of easy ways to keep it in top shape:
- Add silica gel packets to storage containers to soak up any lingering moisture, especially from wet lures.
- Clean off any weeds, moss, or debris from your lures before putting them away.
These small tasks work hand-in-hand with your waterproof storage to keep your gear dry and in great condition.
Think of it like quick-dry fabric technology - it’s all about keeping things moisture-free. Whether you're wearing fishing shorts or men’s fishing shorts, these steps ensure your gear is always safe and ready for your next adventure.
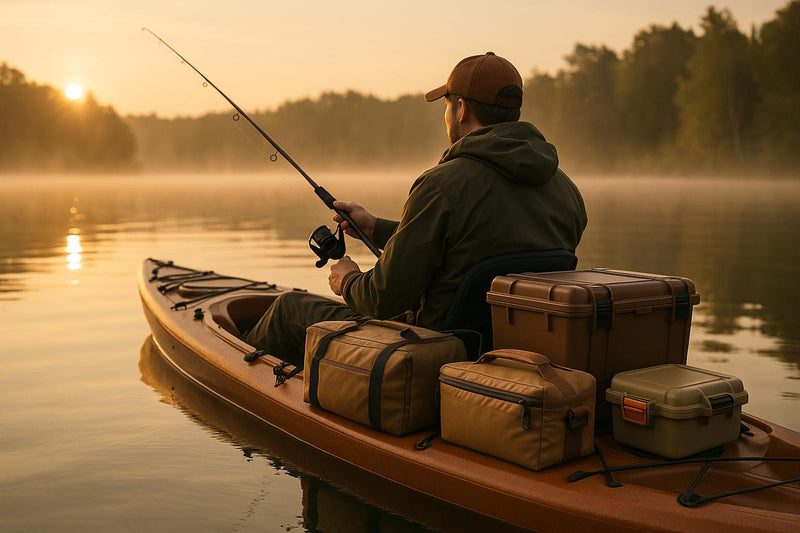
Using Waterproof Storage with Your Fishing Setup
Once your waterproof storage is ready and tested, it’s time to make it an integral part of your fishing gear. The key is finding the right balance between accessibility and protection for your equipment.
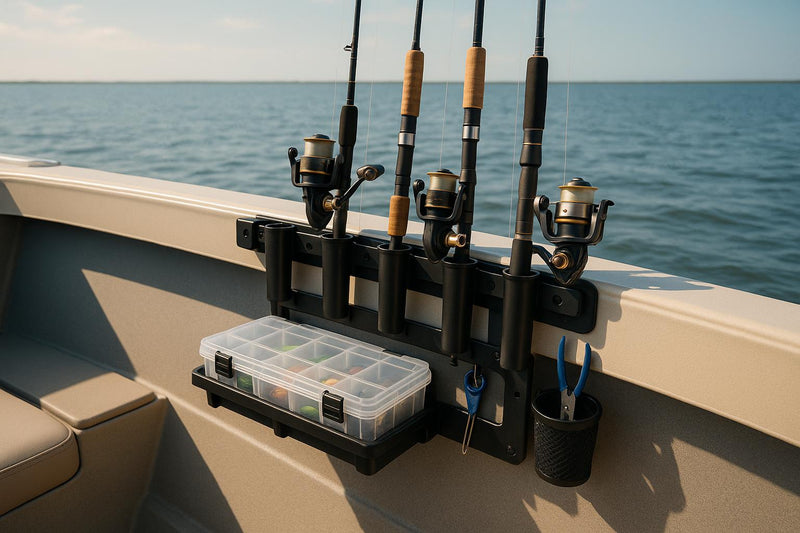
Mounting and Securing Storage on Boats
Properly securing your waterproof storage is crucial to keep it from sliding around or even going overboard when waters get rough. Depending on the size and type of container, you can use bungee cords with hooks for smaller items, adjustable straps with cam buckles for larger boxes, or even marine-grade mounting brackets if you’re looking for a more permanent setup.
For added flexibility, many anglers turn to rail-mounted systems. These clamp onto boat railings and can be adjusted to fit different container sizes. They’re easy to reposition and help distribute weight evenly, which reduces strain on your boat’s hardware.
When planning your setup, think about how your storage integrates with other gear, like moisture-resistant clothing, to create a seamless and practical fishing experience.
Complementary Fishing Gear
To get the most out of your waterproof storage, pair it with gear that’s designed to handle the same conditions. Moisture-resistant apparel works hand-in-hand with your storage to protect your tackle, electronics, and other essentials while keeping you comfortable and ready for action.
For example, fishing shorts and Men's fishing shorts from Reel Comfort are a great addition to your setup. Made with water-resistant fabric, these shorts feature secure pockets and removable thigh pads, offering both convenience and comfort for long days on the water.
Purpose-built clothing with ergonomic designs ensures you can move freely while accessing your storage, no matter where it’s mounted on your boat. When setting up your storage, position it within easy reach of your primary fishing spot, but make sure it doesn’t interfere with your casting or movement around the boat. This thoughtful placement, combined with functional apparel, creates an efficient and hassle-free fishing experience.
For even better performance, check out our fishing shorts. They’re designed to dry quickly, provide ergonomic comfort, and stand up to the challenges of every fishing trip.
Conclusion: Build a Durable, Waterproof Gear Solution
Creating your own waterproof storage is a game-changer for keeping your fishing gear dry, accessible, and well-organized. By following a few key steps - like choosing the right container, ensuring proper seals and gaskets, testing for waterproof integrity, and maintaining it regularly - you can protect your equipment for the long haul. This setup not only keeps your gear safe but also makes your fishing trips smoother and more enjoyable.
The advantages go beyond just keeping your items dry. Waterproof storage helps you avoid the hassle of damaged electronics, rusted tackle, or waterlogged supplies. It cuts down on repairs and ensures you can focus on what matters most - fishing. With regular maintenance, such as checking seals and conducting seasonal inspections, your waterproof storage will continue to safeguard your gear for years to come.
Getting started is simple. Begin with a basic container and some waterproofing materials, then build from there. A modular approach lets you customize your setup to fit your fishing style and gear needs perfectly. And while you're at it, consider upgrading your comfort on the water with Fishing Shorts from Reel Comfort. These shorts are designed with anglers in mind, featuring water-resistant fabric, quick-drying capabilities, and secure pockets for easy access to your essentials.
For even more comfort during long days on the water, check out Men's Fishing Shorts from Reel Comfort. Priced at $59.99, these shorts include ergonomic features like removable thigh pads and a design tailored to keep you comfortable and efficient throughout your fishing trips.
FAQs
What’s the difference between water-resistant and waterproof containers, and how do I pick the right one for fishing?
Water-resistant containers are built to handle light water exposure, like a drizzle or the occasional splash. However, they’re not designed to keep water out if they’re fully submerged. These are a solid choice for casual fishing trips where your gear isn’t likely to face heavy water contact.
On the other hand, waterproof containers are fully sealed, ensuring no water gets in - even if they end up underwater. These are perfect for fishing in wetter conditions, such as during heavy rain or when there’s a risk of your gear being submerged.
When deciding between the two, consider the environment you’ll be fishing in. For low-risk outings with minimal water contact, a water-resistant container is usually sufficient. But if you’re facing harsher conditions or need to protect valuable gear, a waterproof container is the safer bet to keep everything dry and secure.
How do I keep the seals and gaskets in my DIY waterproof fishing storage in good condition over time?
To keep the seals and gaskets in your DIY waterproof fishing storage working properly, store them in a cool, dry spot away from direct sunlight and any harsh chemicals. Ideally, maintain a relative humidity of about 60% and steer clear of overly damp environments.
Check the seals every six months for any signs of wear, like cracks or deformation, and clean them regularly to remove dirt or debris. Plan to replace gaskets every year - or sooner if you notice damage or they start losing flexibility. Storing them in sealed, moisture-resistant containers can also help them last longer and keep your fishing gear safe and dry.
What mistakes should I avoid when creating and maintaining waterproof storage for my fishing gear?
When setting up and maintaining waterproof storage for your fishing gear, there are a few pitfalls you’ll want to steer clear of. One big mistake is neglecting to properly seal and test your containers. Skipping this step can lead to leaks, which might ruin your gear. Always take the time to double-check seals and run a quick waterproofing test before putting your storage to use.
Another common oversight is forgetting regular maintenance. Over time, seals and waterproof materials can break down or lose their effectiveness. To avoid surprises, make it a routine to inspect your storage system. Look for cracks, worn-out seals, or any signs of damage, and fix them right away to keep your gear in top shape.
By paying attention to sealing, choosing durable waterproof materials, and sticking to a maintenance schedule, you can keep your fishing gear dry and ready, no matter the conditions.